Gluten-Free Quinoa Veggie Burgers

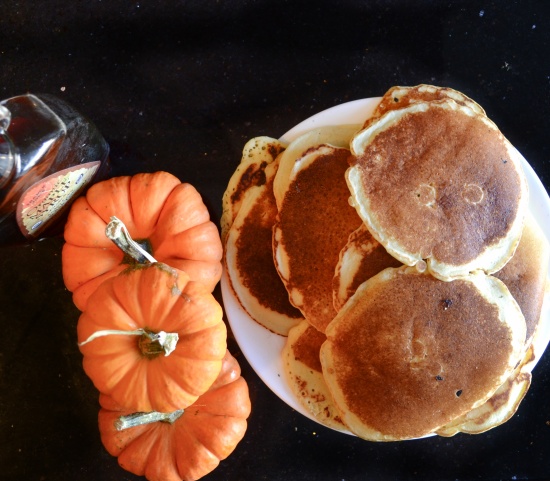
I’m currently going through a veggie burger phase and actually haven’t had a ‘regular’ (meat-based) burger in a really long time. I love how much variety and intricate vegetable combinations a veggie burger can have. The flavors can be anywhere from spicy and powerful to subtle and smooth. After eating a variety of veggie burgers, whether sweet potato, black bean, corn, or quinoa, I decided that I wanted to start making my own. The burgers not only seem like they would be fun to make but also delicious to eat. My plan was to start by following recipes and then move to my own designs.

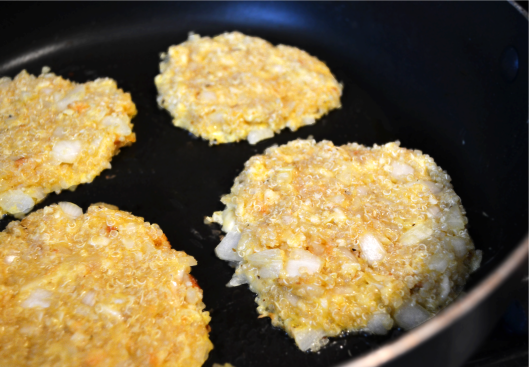
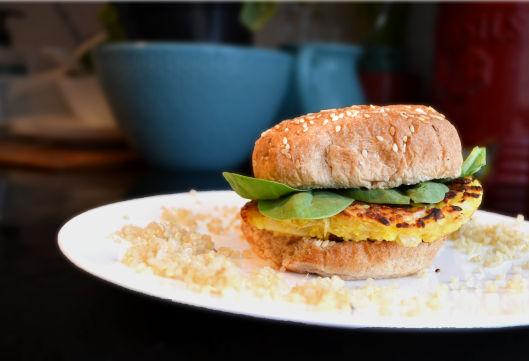
I begin my veggie-burger project with a relatively simple quinoa veggie burger, and I LOVED it! My mom and I ate half a batch of burgers together, and despite the lack of meat in the burgers, we left the table feeling totally full. The egg, cheese, and quinoa were the perfect combination and I would highly recommend these for vegetarians and meat-eaters alike! ENJOY

IMG_3978

IMG_3956

INGREDIENTS:

2 1/2 cups cooked quinoa, at room temperature

4 large eggs, beaten

1/2 teaspoon fine-grain sea salt

1/3 cup finely chopped fresh chives

1 yellow or white onion, finely chopped

1/3 cup or 15 g freshly grated Parmesan cheese

3 cloves garlic, finely chopped

1 cup gluten-free bread crumbs- buy or simply cut gf bread into very small pieces

Water, if needed

1 tablespoon extra-virgin olive oil

  1. Combine the quinoa, eggs, and salt in a medium bowl.
  2. Stir in the chives, onion, cheese, and garlic. Add the bread crumbs, stir, and let sit for a few minutes so the crumbs can absorb some of the moisture.
  3. The dryer the mixture, the dryer the patties. I would reccomend leaving the mixture wet and sticky to create moist burgers. However if it is too dry, add additional breadcrumbs. Conversely, a bit more beaten egg or water can be used to moisten the mixture.
  4. Heat the oil in a large, heavy skillet over medium-low heat, add 3-4 patties, if they’ll fit with some room between each, cover, and cook for 7 to 10 minutes, until the bottoms are deeply browned.
  5. Turn up the heat if there is no browning after 10 minutes and continue to cook until the patties are browned. Carefully flip the patties with a spatula and cook the second sides for 7 minutes, or until golden.
  6. Remove from the skillet and cool on a wire rack while you cook the remaining patties. Alternatively, the quinoa mixture keeps nicely in the refrigerator for a few days; you can cook patties to order, if you prefer.

Love,

Ally

Gluten-Free Coconut Chia Macaroons

Sorry for the long absence. I decided to take a short break from this blog for a few months because of my busy schedule. Volleyball practices ended a few weeks ago, and because I love baking for my team, I have a variety of delicious recipes waiting to be posted!!! With practices and tournaments over and a class that I was taking at John Jay College ending, I’ll have more time to post. Hopefully after my final exams and my project based assessments/PBAs (my public schools opts out of standardized testing and instead tests knowledge through difficult essays, projects and presentations), I will resume my weekly postings!!

I recently saved my babysitting earnings to buy myself photography lighting equipment, and I am hoping to slowly improve the quality of my foodography over the next months. I’m looking forward to “revamping” my website this summer. Much more to come!!!

I decided to repost these macaroons with a new and improved recipe and photos. This recipe is simple, perfect for a snack on a cool spring day, and absolutely delicious. I’ve found that lots of sweet desserts often have an artificial and un-natural taste to them. I love how these macaroons lack those qualities and always taste wholesome and delicious. Definitely a healthier (and gluten-free) alternative to cookies!!

ENJOY!


INGREDIENTS

1/2 cup softened butter

1 cup sugar

4 eggs

1 tsp. vanilla extract

3/4 cup sifted coconut flour (Specifically Trader joe’s)

2 cups Shredded Sweetened Coconut

1 tablespoon of Chia Seeds


DIRECTIONS

  1. Preheat the oven to 375F. Lightly grease a baking sheet
  2. Lightly blend the butter, sugar, eggs and vanilla together. Stir in the coconut flour, shredded coconut and the chia seeds.
  3. The mixture shouldn’t be wet, like a batter. If the mixture is not dry, add additional flour.
  4. Drop tablespoon sized scoops (using a tablespoon or a cookie scoop) onto the baking sheet. The macaroons don’t expand, so don’t worry about placing them close together.
  5. Bake for 12-15 Minutes or until golden brown. The coconut flakes protruding from the macaroons will be significantly darker (see image above). Immediately transfer to a cooling rack and let sit until cool.

Love,

Ally!!

S’more Bars

Oddly enough, when asking my volleyball team for ideas about what to bake, the first request was ‘s’mores cookies’. Not being a lover of marshmallows and never having had a s’more cookie, I immediately dismissed the idea. On my way home from practice, in a taxi with a few girls from my team, I looked up recipes for s’mores cookies. Nothing interesting came up, but the pictures I saw looked sooooo good. I decided that I would make up a recipe on my own.

After a little research and deliberation, I decided that s’mores brownies would be a fresh twist on the cookie concept. I looked up a recipe for s’mores and came across a version that looked delicious. I loosely followed this recipe – adding and subtracting a bunch of ingredients. I brought these bars to Sunday practice, and my team LOVED them. My coach offered to buy me the ingredients if I would make them for him again. The dessert tastes like a campfire; smokey, chocolatey s’mores, but even tastier. These are my new go-to bar recipe. Enjoy!

INGREDIENTS

1cup butter, softened

3cup sugar

1 egg

1 teaspoon vanilla extract

1 1cups flour

3cup graham cracker crumbs

1 teaspoon baking powder

1teaspoon salt

16 oz milk chocolate chocolate chips (of 4 large hershey bars)

3 cups miniature marshmallows

DIRECTIONS

  1. Heat oven to 350ºF. Grease an 8 inch square baking pan.
  2. Beat butter and sugar together until well blended in a large bowl. Add egg and vanilla; beat well.
  3. In another bowl stir together flour, graham cracker crumbs, baking powder, and salt. Add to butter mixture, beating until blended.
  4. Press half the dough into the prepared pan. Bake 15 minutes.
  5. Spread the chocolate chips over the baked layer. Sprinkle with marshmallows. Scatter remaining dough over the marshmallows, forming a top layer.
  6. Bake 10- 15 minutes or until just lightly browned. Cool completely before cutting.

Love,

Ally


http://www.food.com/recipe/smores-bars-169114#activity-feed

Holiday Cranberry Sauce

Being completely honest, I have never actually helped make a Thanksgiving dinner before today. It seems that we were always either going to our friends’ house for the holiday or visiting a relative’s location. But this year, I traveled to my grandmother’s home in Tucson, Arizona for Thanksgiving, and I insisted on contributing. I decided on making cranberry sauce, stuffing, turkey gravy and sweet potatoes. I couldn’t have been prouder of the dishes that I made (except for the gravy which was a total disaster hahaha), and all three dishes were the first to completely disappear!

I have never really been a fan of cranberry sauce and decided to try it because it is such a critical part of the Thanksgiving holiday tradition. Homemade cranberry sauce is so much better than I imagined. Only after eating it did I realize that the reason I never liked cranberry sauce was because it was always from a jar or can. This recipe is a traditional, simple cranberry sauce, but ended up tasting so smooth, flavorful and fruity. The lemon definitely adds a kick of flavor that the cranberry sauce usually lacks.

In advance, this recipe is very sweet and tastes more like a fruit-based, dessert-like side dish rather than a savory sauce. If you want to tone the sweetness down a little, simply add less sugar.

ENJOY!


dsc_0011

dsc_0017

dsc_0007

Ingredients

1 cup sugar

12 oz bag fresh cranberry

1 tsp of lemon zest

2 tbsp water

Directions
1. Empty the cranberries into a saucepan and transfer 1/2 cup of them to a seperate small bowl.

2. Add sugar, lemon zest and water to the saucepan and cook over low heat, stirring occasionally, until the sugar dissolves and the cranberries become soft, about 10 minutes.

3. Increase the heat to medium and cook until the cranberries burst, about 12 minutes.

4. Reduce the heat to low and stir in the 1/2 cup of reserved cranberries. Add more sugar, salt and pepper to taste and cool to room temperature before serving.

Love,

Ally

Vegan Banana Muffins

There is an incredible little store called “Health Nuts” down the street on the corner of 99th and Broadway. They have a variety of gluten-free mixes, cookies, flowers etc., about 20 different flavors of Stevia extract (didn’t even know it came in any more than one) and, of course, many vegan ingredients. This may sound odd, but on the way home from school, I sometimes walk into the store and just look around for ideas of what to make next. The other day I simply decided that I was going to make a through-and-through moist and savory batch of banana muffins. I found a recipe on my favorite cooking site (http://minimalistbaker.com) and was surprised to see the simplicity of cooking vegan. My goal of making these was to finally use flax-eggs (I had just bought a bag of ground flax at health nuts), and ultimately make a vegan recipe that even non-vegans would love.

I handed out a bunch to my vegan friends at school and everyone devoured them. One of my friends was so excited to to finally eat a muffins that actually tasted good, that she ate three for lunch. She also tricked her non-vegan friend into thinking that they were regular banana cupcakes and he ate the entire thing. Only after did she mention that it was vegan.

I hope you enjoy as much as my friends and I did!

0muffin-favorite

5-muffin-favorite

7-muffin-favorite

6-muffin-favorite


INGREDIANTS

Muffins:

2 flax eggs

4 medium ripe bananas (don’t worry about measurements – it’s forgiving)

heaping 1/2 cup brown sugar, packed

1/4 cup vegan butter (such as Earth Balance) or coconut oil, melted

1 tsp vanilla extract

2 tsp baking soda

1/2 tsp sea salt

1.5 cups whole wheat pastry flour (or unbleached all purpose)

1/2 cup rolled oats

1/4 cup walnuts, chopped (optional)

Crumble Top:

1/4 cup raw sugar

5 Tbsp unbleached all purpose flour

2 Tbsp vegan butter (such as Earth Balance)

DIRECTIONS
  1. Preheat oven to 375 degrees F and lightly grease a standard size muffin tin (will make 10-11 muffins)
  2. Prepare flax egg in a large mixing bowl. Let set for 5 minutes.
  3. Add banana and mash, leaving just a bit of texture.
  4. Add brown sugar, baking soda, salt and whisk for one minute.
  5. Stir in vanilla, melted butter and mix.
  6. Add flour and oats and stir with a spoon or spatula until just combined. Lastly, fold in walnuts (optional).
  7. Divide batter evenly among 10-11 muffin tins, filling a generous 3/4 full (I fill mine practically full for aesthetic effect).
  8. Quickly wipe your mixing bowl and add crumble ingredients. Prepare crumble top by mashing ingredients together with a fork until crumbly like wet sand. Generously top muffins with streusel. You should have leftovers.
  9. Bake for 17-22 minutes or until tops are golden brown and a toothpick or knife comes out clean. Let cool for a few minutes, remove from muffin tin and serve warm. Once completely cooled, store in a covered container at room temp for several days. Freeze for longer term storage.

Thanks to Minimalist Baker for the incredible recipes!!

Vegan Cupcakes with Chocolate Frosting

When I was 9 years old, in the same weekend I visited a wonderful petting zoo in Oakland on Saturday and on Sunday I was ‘taught’ the in’s and out’s of animal cruelty by my 7 year old next door neighbor and good friend. Of course, I ultimately decided to become a strict vegetarian. Like most children trying new things, this attempt lasted no longer than two weeks. My parents ‘cure’ was to cook spaghetti and meatballs for dinner.

Although my vegetarianism was a short-lived extravaganza, I have always admired the ideals and reasoning behind vegetarian and/or vegan living. In my English class this year we were assigned a creative project on a societal flaw, and one of my peers chose to present on animal cruelty and the motives behind living a vegan life. Her presentation was both fascinating and heartbreaking, and I immediately became interested in vegan lifestyles. This let me to research vegan recipes. After trying a few out, I started to fall  in love with vegan baking. Knowing that I will probably never be vegan doesn’t stop me from trying to bake delicious vegan treats.

While eating at vegan restaurants in NYC is always an eye-opening and fun experience, I struggle to find homemade vegan cookies, cupcakes brownies etc. that I am proud to give out to my vegan friends. This recipe is definitely an exception. These vegan vanilla cupcakes tasted no different than any other cupcake I’ve made, and the chocolate frosting, even without butter and milk, tasted delicious. My success with this recipe has definitely inspired me to continue to trying vegan recipes in the future. I can’t wait to try some vegan brownies next! ENJOY!

dsc_0105


dsc_0094

INGREDIANTS:

Cupcakes:

1 tablespoon apple cider vinegar

1 1/2 cups almond milk

2 cups all-purpose flour

1 cup white sugar

2 teaspoons baking powder

1/2 teaspoon baking soda

1/2 teaspoon salt

1/2 cup coconut oil, warmed until liquid

1 1/4 teaspoons vanilla extract

Vegan Buttercream Chocolate Frosting:

1 cup cocoa powder, unsweetened (sifted)

1 1/4 sticks of vegan butter (softened)

3 1/2 cups powdered sugar

1/2 cup non-dairy milk (almond)

1 tsp vanilla extract


DIRECTIONS:

  1. Preheat oven to 350 degrees F . Grease two 12 cup muffin pans or line with 18 paper baking cups.
  2. Measure the apple cider vinegar into a 2 cup measuring cup. Fill with almond milk to make 1 1/2 cups. Let stand until curdled, about 5 minutes.
  3. In a large bowl, Whisk together the flour, sugar, baking powder, baking soda and salt.
  4. In a separate bowl, whisk together the almond milk mixture, coconut oil and vanilla.
  5. Pour the wet ingredients into the dry ingredients and stir just until blended. Spoon the batter into the prepared cups, dividing evenly.
  6. Bake in the preheated oven until the tops spring back when lightly pressed, 15 to 20 minutes. When done, cool in the pan over a wire rack.
  7. While the cupcakes are baking, make the vegan frosting:
    1. Add the butter, milk, vanilla extract and cocoa powder to a large mixing bowl and using an electric hand or standing beater, start mixing them together until the liquids thicken with the fluffy cocoa. Turn beater on low and beat until smooth.
    2. Add in the powdered sugar one cup at a time and beat until frosting is fluffy. Avoid overbeating.
  8. Frost the chocolate frosting onto the cupcakes when they are completely cooled. If the cakes are warm, the heat will easily melt the vegan butter.

Love,

Ally!

Simple Gluten-Free Pancakes

Although gluten-free cooking and baking often tastes as good as using similar substitutes or ingredients that contain gluten, sometimes discovering delicious, gluten-free recipes has proven more difficult than expected. The wide variety of different gluten-free ingredients has made being gluten-free in the 21st century relatively easy if you set your mind to it. BUT, surprisingly, one of the most difficult gluten-free challenges that I have faced are completely homemade gluten-free pancakes.

There are many different gluten-free pancake mixes that make incredible pancakes, but for some reason making gluten-free pancakes from scratch is really hard. The end result often tastes too dry, not fluffy enough, too dense or just tasteless. The other day, I found a recipe on the back of a gluten-free all-purpose flour and decided to try it out. They were soooooo good! If I was given a plate of regular pancakes and a plate of these gluten-free ones, I probably wouldn’t be able to tell which is which. They were moist, fluffy and flavorful. My mom and I didn’t even need syrup! I hope they come out as delicious for you as they did for me!

edited-pancake-cover

INGREDIENTS

3cup gluten-free flour (I use Gluten-Free Flour Blend)

1teaspoon xanthan gum or 12 teaspoon guar gum

1 1teaspoons baking powder

1teaspoon salt

1 teaspoon sugar

2cup milk

1/2 tsp vanilla

2 eggs

2 tablespoons cooking oil

DIRECTIONS

  1. Combine all dry ingredients in a bowl.
  2. In a separate bowl, whisk together milk, vanilla, eggs, and cooking oil.
  3. Add milk mixture to the dry ingredients, and whisk until well blended.
  4. Let stand for about 10 minutes.
  5. Preheat ungreased, non-stick frying pan to medium heat.
  6. Pour batter by spoonfuls onto the hot pan.
  7. Pancakes are ready to be turned over when the edges are no longer glossy, and the bubbles that pop stay open. To check the second side for doneness, you just have to lift an edge of the pancake up with a spatula and take a peek.

Love,

Ally

Fall Chicken and Pumpkin Soup

I’m sure a ‘pumpkin pattern’ is starting to reveal itself on my blog this year. Pumpkin, being a vital symbol to Fall spirit, is one of my favorite items right now; not only in cooking and baking. My bathroom hand-soap is pumpkin scented, we have pumpkin pie and cinnamon flavored candles all over our apartment, and my dad just brought home pumpkin almond milk and pumpkin Cheerios from the grocery store.

This A-M-A-Z-I-N-G soup is the perfect pumpkin dish. It is unique and my dad said “It’s the first dish I can say is better than my Halloween chili!!” (A compliment that I never thought I’d hear him offer). The flavor of the pumpkin is subtle enough that it doesn’t overshadow the other ingredients but is strong enough to make the soup very full-flavored and interesting. The spices give this hearty dish a strong eccentric flavor that is memorable and a perfect representation of Fall cooking. After helping ourselves to seconds (despite being full), we decided that this recipe will become a Fall regular in our home. I hope you enjoy as much as I did!!!

finalsoip

finalsoup7

Ingredients

1 Tbsp olive oil

1 medium yellow onion

2 cloves garlic

5 cups chicken broth

1 large chicken breast (3/4 lb.)

1 (15 oz.) can pumpkin pureé

1 (15 oz.) can black beans

½ cup frozen corn kernels

1-2 chipotle peppers in adobo sauce

1 Tbsp cumin

½ tsp salt

½ bunch fresh cilantro

Directions

  1. Dice the onion and mince the garlic. Add both to a large soup pot along with the olive oil and sauté over medium heat until the onions are translucent (3-5 min.)
  2. Add the chicken breast (whole) and chicken broth. Place a lid on the pot, turn the heat up to high, and allow it to come to a full boil. As soon as it reaches a boil, turn the heat down to low and allow the pot to simmer for 30 minutes. Make sure the pot does not stop simmering after turning down the heat. If it does, increase the heat slightly until it is gently simmering.
  3. After 30 minutes, remove the chicken breast from the broth and use two forks to shred the meat. Return the shredded meat to the pot.
  4. Add the pumpkin purée and stir until the it has mixed into the broth.
  5. Take one or two chipotle peppers from the can (one pepper for a milder soup, two for a spicier soup) and mince them. Add the minced peppers and about a teaspoon of the adobo sauce from the can to the soup.
  6. Rinse the black beans and add them to the soup, along with the frozen corn kernels and cumin. Allow the soup to come up to a simmer and cook for about 10 minutes more to allow the flavors to blend.
  7. Taste the soup and add about ½ teaspoon of salt if desired. Roughly chop the cilantro and stir it into the soup just before serving.

Love,

Ally

I give an immense amount of credit to Budget Bites, for this flavorful and incredible soup (http://www.budgetbytes.com/2013/08/chicken-pumpkin-soup/)