Double Chocolate Cookies

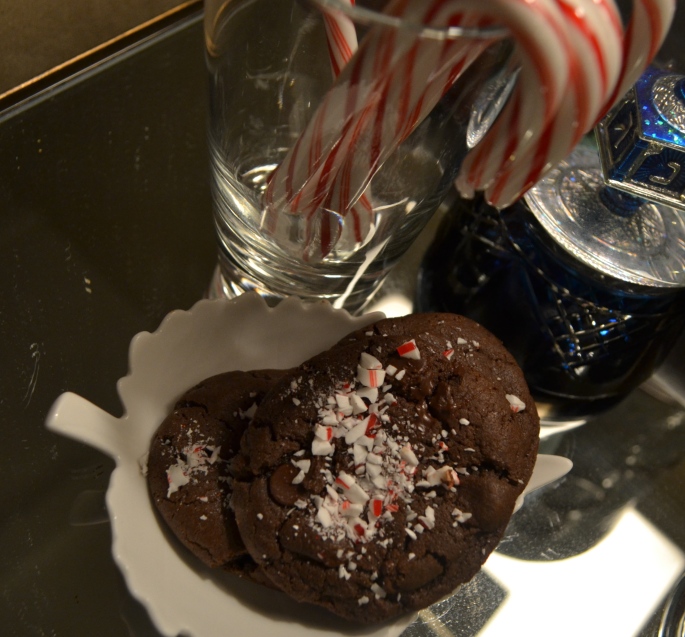
There is not much to write about these chocolate cookies besides…. YUMMM.
To my delight, the East Coast was hit with a huge snowstorm a few weeks ago. As a result, the majority of the public and private schools in the area were given the whole day off!! I was able to sleep in, wear sweat pants all day, and finally find time to bake.
I wanted to bake cookies for my volleyball practice that I had that evening.  I was so excited for my team to enjoy these cookies after the grueling practice that was sure to come, only to find out an hour after they came out of the oven that practice was cancelled. I promised my team that I would bring the cookies to our practice the next day, but woke up late and forgot them in my scramble to get out the door. Unfortunately, my team wasn’t able to try these, but they are patiently awaiting my promised new batch this weekend.
These chocolate cookies are the perfect combination of soft, gooey, and crunchy. The chocolate flavor is prominent and so mouthwatering, and it’s almost impossible not to go for seconds. I threw in a few white-chocolate chips and used dark-chocolate chips instead of semi-sweet. Although small, this change offered unique taste and twist. As a plus, my entire apartment smelled of chocolate for days 🙂 . ENJOY!

dsc_0301

dsc_0304

dsc_0309

INGREDIENTS

2 cups all-purpose flour

2 teaspoons vanilla extract

2 eggs

1 1/2 cups white sugar

1 cup butter, softened

2/3 cup cocoa powder

3/4 teaspoon baking soda

1/4 teaspoon salt

2 cups semisweet chocolate chips (or chocolate chips of your choice: white, dark, butterscotch will all work)


DIRECTIONS

  1. Preheat oven to 350 degrees F (175 degrees C).
  2. In large bowl, beat butter, sugar, eggs on medium for 3 minutes. Add the eggs and vanilla and beat until light and fluffy.
  3. In a separate bowl, whisk the flour, cocoa, baking soda, and salt together. Beat the flour mixture into the butter mixture in three groups, blending well after each. Beat until well blended
  4. Mix in the chocolate chips and place the mixing bowl in the refrigerator for ten minutes to let it chill slightly.
  5. Drop by rounded teaspoonfuls onto ungreased cookie sheets. For a less rounded cookie, press the cookie dough balls down slightly.
  6. Bake for 8 to 10 minutes in the preheated oven, or just until set. The cookies will appear very gooey, but will harden as they cool. Cool slightly on the cookie sheets before transferring to wire racks to cool completely.
  7. Enjoy with a glass of milk and a snowy day!


Love,

Ally

Vegan Cupcakes with Chocolate Frosting

When I was 9 years old, in the same weekend I visited a wonderful petting zoo in Oakland on Saturday and on Sunday I was ‘taught’ the in’s and out’s of animal cruelty by my 7 year old next door neighbor and good friend. Of course, I ultimately decided to become a strict vegetarian. Like most children trying new things, this attempt lasted no longer than two weeks. My parents ‘cure’ was to cook spaghetti and meatballs for dinner.

Although my vegetarianism was a short-lived extravaganza, I have always admired the ideals and reasoning behind vegetarian and/or vegan living. In my English class this year we were assigned a creative project on a societal flaw, and one of my peers chose to present on animal cruelty and the motives behind living a vegan life. Her presentation was both fascinating and heartbreaking, and I immediately became interested in vegan lifestyles. This let me to research vegan recipes. After trying a few out, I started to fall  in love with vegan baking. Knowing that I will probably never be vegan doesn’t stop me from trying to bake delicious vegan treats.

While eating at vegan restaurants in NYC is always an eye-opening and fun experience, I struggle to find homemade vegan cookies, cupcakes brownies etc. that I am proud to give out to my vegan friends. This recipe is definitely an exception. These vegan vanilla cupcakes tasted no different than any other cupcake I’ve made, and the chocolate frosting, even without butter and milk, tasted delicious. My success with this recipe has definitely inspired me to continue to trying vegan recipes in the future. I can’t wait to try some vegan brownies next! ENJOY!

dsc_0105


dsc_0094

INGREDIANTS:

Cupcakes:

1 tablespoon apple cider vinegar

1 1/2 cups almond milk

2 cups all-purpose flour

1 cup white sugar

2 teaspoons baking powder

1/2 teaspoon baking soda

1/2 teaspoon salt

1/2 cup coconut oil, warmed until liquid

1 1/4 teaspoons vanilla extract

Vegan Buttercream Chocolate Frosting:

1 cup cocoa powder, unsweetened (sifted)

1 1/4 sticks of vegan butter (softened)

3 1/2 cups powdered sugar

1/2 cup non-dairy milk (almond)

1 tsp vanilla extract


DIRECTIONS:

  1. Preheat oven to 350 degrees F . Grease two 12 cup muffin pans or line with 18 paper baking cups.
  2. Measure the apple cider vinegar into a 2 cup measuring cup. Fill with almond milk to make 1 1/2 cups. Let stand until curdled, about 5 minutes.
  3. In a large bowl, Whisk together the flour, sugar, baking powder, baking soda and salt.
  4. In a separate bowl, whisk together the almond milk mixture, coconut oil and vanilla.
  5. Pour the wet ingredients into the dry ingredients and stir just until blended. Spoon the batter into the prepared cups, dividing evenly.
  6. Bake in the preheated oven until the tops spring back when lightly pressed, 15 to 20 minutes. When done, cool in the pan over a wire rack.
  7. While the cupcakes are baking, make the vegan frosting:
    1. Add the butter, milk, vanilla extract and cocoa powder to a large mixing bowl and using an electric hand or standing beater, start mixing them together until the liquids thicken with the fluffy cocoa. Turn beater on low and beat until smooth.
    2. Add in the powdered sugar one cup at a time and beat until frosting is fluffy. Avoid overbeating.
  8. Frost the chocolate frosting onto the cupcakes when they are completely cooled. If the cakes are warm, the heat will easily melt the vegan butter.

Love,

Ally!

5-Minute Easy Molded Chocolate

After making Oreo truffles, I ended up with leftover chocolate, so I quickly threw the melted chocolate into molds that I already had. My chocolates are very simple, and I wish that I had some cute candies, dried fruits, or nuts to top them with. I love simple desserts like this because you could go crazy, filling it with caramel, dried coconut, sprinkles or pretty much anything sweet or salty and they will always turn out amazing. If you need an easy and quick treat, this recipe is definitely for you. These truffles are so easy to throw together and always look gorgeous no matter how messy you were in making them. I recommend serving these as small treat at a summer tea party or barbecue for your guests to enjoy after the meal. They are also a great accompaniment to any cake or larger dessert.

ENJOY!!


OLYMPUS DIGITAL CAMERA

OLYMPUS DIGITAL CAMERA

P1011143.JPG


INGREDIANTS:
-Chocolate Mold (http://www.amazon.com/Freshware-CB-114RD-30-Cavity-Silicone-Chocolate/dp/B003VPW0V8/ref=sr_1_5?ie=UTF8&qid=1464639353&sr=8-5&keywords=chocolate+mold)

-Multiple Kinds of any chocolate (Milk, Dark, White, Semi-Sweet etc.)

-A variety of toppings (Sprinkles, candies)

DIRECTIONS:

  1. If desired, sprinkle the toppings onto the bottom of each mold.
  2. Melt each type of chocolate separately by microwaving and stirring the chocolate  in thirty second increments for a total of about 90-120 seconds. Do not over melt the chocolate, as it will burn and harden.
  3. Fill each mold with the chocolate slowly with a squeeze bottle, spoon, or by pouring the chocolate from a measuring cup. You can mix multiple kinds of chocolate in a single mold, BE CREATIVE.
  4. Using your palette knife or spatula, scrape off any excess chocolate into a clean bowl; it can be gently warmed and reused.
  5. When the back of the mold is smooth and even, gently tap the tray of chocolates on the countertop to pop any air bubbles.
  6. If you’re making lollipops, insert the sticks, twisting gently so that they’re completely coated with chocolate.
  7. To make the chocolate harden quickly, put it in the freezer for a few minutes.
  8. Once the chocolate is firm enough to come out of the mold, invert the entire mold onto a clean towel and twist very gently to release the chocolates.
  9. Eat!


Love,

Ally


Flourless Chocolate Cake

Like many other bakers I know, I LOVE decorating cakes and, although challenging, I enjoy myself. My brother’s high school graduation was in June, and I was so excited to make a fun and creative cake for him. I first drew sketches of how I wanted his cake to look, and I couldn’t wait to get started. Since he will be attending Brown University, I planned of the design centering around the Brown logo with the years he will be attending on the side.

Unfortunately our apartment was cleaned top-to-bottom 3 days before the party, and the kitchen was off-limits to me for the week. So I was unable to make the cake for his official party. I decided that I would still make a belated graduation cake. I wanted my mom to be able to enjoy it, and so I was determined to find a gluten-free recipe. What is better than a rich, decedent flourless chocolate cake? This cake is so creamy but also so smooth and sensational. My brother loved it, and I could not have been more proud. This is one of my favorite gluten-free cakes, and I was so glad that my entire family could enjoy it.

I used a simple buttercream frosting recipe to make the cake more “birthday cake-like”, but I would highly recommend using a chocolate ganache as a glaze instead. ENJOY!

DSC_0162

DSC_0055

DSC_0136


INGREDIENTS

1 cup semisweet or bittersweet chocolate chips

1/2 cup unsalted butter

3/4 cup granulated sugar

1/4 teaspoon salt

1 to 2 teaspoons espresso powder optional

1 teaspoon vanilla extract, optional

3 large eggs

1/2 cup unsweetened cocoa powder


Optional Chocolate Ganache Glaze

1 cup semisweet or bittersweet chocolate chips

1/2 cup heavy cream


DIRECTIONS

  1. Preheat the oven to 375°F. Lightly grease an 8″ round cake pan; cut a piece of parchment or waxed paper to fit, grease it, and lay it in the bottom of the pan.
  2. To make the cake: Put the chocolate and butter in a microwave-safe bowl, and heat until the butter is melted and the chips are soft. Stir until the chips melt, reheating briefly if necessary. You can also do this over a burner set at very low heat. Transfer the melted chocolate/butter to a mixing bowl.
  3. Stir in the sugar, salt, espresso powder, and vanilla. Espresso enhances chocolate’s flavor much as vanilla does; using 1 teaspoon will simply enhance the flavor, while 2 teaspoons will lend a hint of mocha to the cake.
  4. Add the eggs, beating briefly until smooth. Add the cocoa powder, and mix just to combine.
  5. Spoon the batter into the prepared pan.
  6. Bake the cake for 25 minutes; the top will have formed a thin crust, and it should register at least 200°F on an instant-read thermometer inserted into its center.
  7. Remove it from the oven, and cool it in the pan for 5 minutes.
  8. Loosen the edges of the pan with a table knife or nylon spreader, and turn it out onto a serving plate. The top will now be on the bottom; that’s fine. Also, the edges will crumble a bit, which is also fine. Allow the cake to cool completely before glazing.

To make the glaze: Combine the chocolate and cream in a microwave-safe bowl, and heat until the cream is very hot, but not simmering. Remove from the microwave, and stir until the chocolate melts and the mixture is completely smooth. Spoon the glaze over the cake, spreading it to drip over the sides a bit. Allow the glaze to set for several hours before serving the cake.


Love,

Ally

Classic Brownies with Chocolate Topping

I was scrolling through my blog this morning when I realized that I hadn’t yet posted a brownie recipe. While I don’t always prefer mass amounts of chocolate, brownies seem to change my entire perspective on it. From crispy to gooey, I don’t think that I have ever had a bad homemade brownie. 

After school I came home and immediatly whipped up a batch of this simple but amazing brownie recipe. This was originally posted on allrecipes.com and currently has almost 7000 reviews and over 4.5 stars. I never thought that a recipe so delicious could be so simple. I made two batches that each took me less than ten minutes to prepare. If you have time, be sure to make the chocolate topping, it is a perfect add in! ENJOY!

Ingredients:

1/2 cup butter

1 cup white sugar

2 eggs

1 teaspoon vanilla extract

1/3 cup unsweetened cocoa powder

1/2 cup all-purpose flour

1/4 teaspoon baking powder

Frosting:

3 tablespoons butter, softened

3 tablespoons unsweetened cocoa powder

1 tablespoon honey

1 teaspoon vanilla extract

Directions:

  1. Preheat oven to 350 degrees F (175 degrees C). Grease and flour an 8-inch square pan.

  2. In a large saucepan, melt 1/2 cup butter. Remove from heat, and stir in sugar, eggs, and 1 teaspoon vanilla. Beat in 1/3 cup cocoa, 1/2 cup flour, salt, and baking powder. Spread batter into prepared pan.
  3. Bake in preheated oven for 25 to 30 minutes. Do not overcook.
  4. To Make Frosting: Combine 3 tablespoons softened butter, 3 tablespoons cocoa, honey, 1 teaspoon vanilla extract, and 1 cup confectioners’ sugar. Stir until smooth.
  5. Frost brownies while they are still warm. Let sit in pan until cool. 

Love,

Ally

Caramel Chocolate Cake in a Mug

Made In a Mug Miniseries

One problem that often arises when I bake is the mess. Unless I am working extraordinary hard to be clean, the kitchen always ends up looking like a tornado blew through. After a couple years of making an absolute disaster, my parents came up with a checklist that I had to complete while cleaning up. If I don’t complete the checklist, than I can’t bake or cook for the rest of the week.

Another problem with baking so often is that there is no one to eat the leftovers. My family has next to no willpower; so whenever I bake something, they make me immediately take it to school, volleyball or give the treats to a friend.

So since I am tired of bringing my treats to school all the time, not being able to bake for a week,  and having to clean up for so long after I use the kitchen, I have decided to take a short break from ‘baking’. I decided that for the rest of the month, that I am going to do a “Made in a Mug miniseries.” Basically, I’ll only be posting recipes that are created in mugs and baked/cooked in the microwave. This allows me to cook single serving recipes for my brother or parents, minus the mess that baking usually creates.

I have loved making mug cakes, brownies, pies etc. since I got a book from our very close family friends. This book has a hundred really creative mug recipes. Before receiving the book, I tried making mug cakes and they seemed to always turn out either dry or overly sticky and have little flavor. So far every recipe that I have tried from this book has been so amazing and sometimes even better than a real cake.

Here is my first recipe in the miniseries; “Caramel Chocolate Cake in a Mug.” I gave both servings to my brother (after trying a bite of course), and he thought that it was sooooo delicious.

Caramel Chocolate Cake in a Mug

OLYMPUS DIGITAL CAMERA

OLYMPUS DIGITAL CAMERA


OLYMPUS DIGITAL CAMERA

Ingredients

1 egg

3 1/2 tbsp vegetable oil

3 1/2 tbsp milk (skim, 2%, whole milk)

2 tbsp granulated sugar

1/4 tsp vanilla

2 tbsp unsweetened cocoa powder

1/4 cup of flour

1 tsp baking powder

Pinch of Kosher Salt

5 tablespoons of caramel sauce (homemade preferred)

Caramel Sauce Recipe:  Add 2 cups of packed brown sugar, 1/2 cup of heavy cream and pinch of salt to a saucepan over medium-low heat. Combine with a wooden spoon or silicon spatula until completely mixed. Next, cut 1/2 cup of salted butter into pieces and and add to the pan. Allow the butter to melt completely. Cook while constantly stirring until the caramel sauce thickens, about 5 to 7 minutes, the mixture will reach a large simmer/small boil. Stir in 1 tbsp vanilla and cook for an additional minutes. Allow to cool in the saucepan for about 3 minutes and then transfer to a container and cool for 15 minutes before adding to the brownie.

Directions

  1. In a large mug or small bowl, whisk together the egg and oil with a fork. Stir in the milk, sugar and vanilla until combined.
  2. Add the cocoa, flour, and salt. Beat the batter until smooth.
  3. Stir in only 3 tbsp of the caramel sauce and divide the batter into two separate mugs.
  4. Microwave each mug separately for 1 to 2 minutes. When you take out the mug, the batter should look moist, but a fork should will come out clean. It is very easy to overcook because the cakes continue to cook in the mug after removing from the microwave. 
  5. Top each mug with one of the remaining 2 tbsp of caramel sauce. Let cool for 3-4 minutes and serve.

Love,

Ally


Double Chocolate Peppermint Cookies

Happy Holidays! While I don’t celebrate Christmas, I am still a big sucker for holiday spirit. From walking around the winter markets in Colombus circle and Union square to dressing in sweaters and cute boots, I adore the winter. Even though there is an extreme lack of holiday snowfall this year, there is still no better place to be in the country than Manhattan in December. If you haven’t been in the city during the holidays, schedule a trip out asap. You definitely won’t regret it!

The best way to express your love in the winter is to make a soft, chewy and absolutely incredible peppermint chocolate cookie. I made these a week ago and I’m still mad at my Dad for taking them all to work with him, because they were literally some of the best cookies that I think I’ve ever made. ENJOY!

DSC_0012

DSC_0032

Ingredients:

  • 1/2 cup (1 stick) unsalted butter, softened
  • 3/4 cup sugar
  • 1 egg
  • 1/4 tsp natural peppermint extract
  • 1 1/4 cup unbleached all purpose flour (or whole wheat pastry)
  • 1/3 cup cocoa powder
  • 1/4 tsp salt
  • 1/2 tsp baking soda
  • 1/4 tsp baking powder
  • 2 candy canes, finely crushed
  • 2/3 cup dark, bittersweet or semisweet chocolate chips
Instructions:
  1. Preheat oven to 350 degrees F.
  2. In a large bowl, cream the butter and sugar together for 1-2 minutes. Add egg, peppermint extract and beat until light and fluffy, scraping down the sides as you go to ensure even mixing.
  3. Add flour, salt, cocoa powder, baking soda and powder to a sifter and sift gradually over the wet ingredients mixing in groups as you sift. Mix until well combined.
  4. Add chocolate chips and stir in with a mixing spoon. Chill in the freezer for 10 minutes while the oven finishes heating.
  5. Form the dough into small balls (heaping 1 Tbsp) and place 1.5 inches apart on an ungreased or parchment-lined baking sheet. Press the tops down and then top with a few more chocolate chips.
  6. Bake for 10-12 minutes – the edges should start to dry but the tops will still be slightly soft looking. Sprinkle crushed candy cane over the tops of the cookies immediately after taking out of the oven. This allows the candy cane bits to stick onto the cookie, there is no need to push down on the candy cane.
  7. Let set on the cookie sheet for 3-4 minutes. Transfer to a cooling rack to rest until cooled. They definitely taste the best immediately after cooling (when slightly warm), but feel free to store in an airtight container to keep fresh for up to a few days or freeze for several weeks.

Love,

Ally

Original Recipe: http://minimalistbaker.com/chewy-double-chocolate-peppermint-cookies/

A Cookie or a Brownie or an Oreo? Or all three?!

I found and made these today with a friend and they were delicious! I substituted the chocolate chips in the chocolate chip cookie layer for butterscotch, to reduce the amount of chocolate in the final product. The butterscotch added a very unique flavor to the dessert and I would recommend this substitution if you are a butterscotch lover. Feel free to use whatever kind of chip you would like.

I ignored the second part of step ten (“It’s OK if the knife has some brownie on it. It’s easy to over-bake the cookie layer if left in the oven too long”) and unfortunately slightly burnt the cookie layer.

dsc_0108

dsc_0109

dsc_0121

Ingredients

For the brownie layer

10 tablespoons unsalted butter

1 1cups white sugar

3cup cocoa powder

1teaspoon salt

2 teaspoons vanilla extract

2 large eggs

1cup all-purpose flour

For the Oreo layer

1 package Oreo cookies (my pan fit 16)

For the caramel layer

1 jar dulce de leche or carmel sauce

For the chocolate chip cookie layer

1cup unsalted butter (at room temp)

1cup brown sugar

3cup white sugar

1 egg

1 1teaspoons vanilla extract

1 1cups all-purpose flour

12 teaspoon salt

1teaspoon baking soda

1teaspoon baking powder

1 cup semi-sweet chocolate chips (again, feel free to substitute with any kind of ‘chip’)

Directions:

  1. Pre-heat your oven to 350 degrees.
  2. Line the bottom of an 8×8 baking pan (or use a 9×13 pan if gooey centers bother you) with tin foil and then spray the foil liberally with baking spray.
  3. Make the brownie layer per box instructions (without baking) OR: In a medium sauce pan, melt the butter over medium-high heat. Once melted, add the sugar and cocoa powder. Stir to combine and remove from the heat. Add the salt, vanilla and eggs to the batter and then whisk until combined. In a separate bowl, sift the flour and then slowly incorporate the flour into the batter until it’s all mixed. Set the batter aside.
  4. If making your own cookie dough: In a large bowl, cream together the butter and sugars with a hand mixer. Add the eggs one at a time and then the vanilla, scraping down the sides of the mixing bowl as you go. Add the flour, salt, baking soda and baking powder and mix on low until incorporated. Fold in the chocolate chips and then set aside.
  5. Assemble!
  6. Start by gently pressing the cookie dough into the bottom of the pan, making sure to create an even layer. (I found it helpful to use the back of a 1-cup measure cup.).
  7. Then add a layer of Oreos on top of the cookie dough. Nudge them as close together as possible without overlapping.
  8. Get ready for the gluttony: Remove the lid on the caramel sauce/dulce de leche and microwave for 35 seconds (until it becomes slightly warm and spreadable). Use a spoon to drizzle the caramel over the Oreos.
  9. Lastly: Pour the brownie batter on top of the caramel-Oreo layer. Use a spatula to make sure it’s even.
  10. Bake for 30-35 minutes. Test with a knife to see if the center is done. It’s OK if the knife has some brownie on it. It’s easy to over-bake the cookie layer if left in the oven too long.
  11. Once out of the oven, heat up the caramel again as in step 8. With a spoon, lightly drizzle the caramel over the brownies. Optionally, sprinkle with fluer de sal.
  12. *Although you can scarf these up right away, they actually get better with age. Let them rest for several hours for easier handling and serving.

Love,

Ally!