Gluten-Free Quinoa Veggie Burgers

I’m currently going through a veggie burger phase and actually haven’t had a ‘regular’ (meat-based) burger in a really long time. I love how much variety and intricate vegetable combinations a veggie burger can have. The flavors can be anywhere from spicy and powerful to subtle and smooth. After eating a variety of veggie burgers, whether sweet potato, black bean, corn, or quinoa, I decided that I wanted to start making my own. The burgers not only seem like they would be fun to make but also delicious to eat. My plan was to start by following recipes and then move to my own designs.

I begin my veggie-burger project with a relatively simple quinoa veggie burger, and I LOVED it! My mom and I ate half a batch of burgers together, and despite the lack of meat in the burgers, we left the table feeling totally full. The egg, cheese, and quinoa were the perfect combination and I would highly recommend these for vegetarians and meat-eaters alike! ENJOY

IMG_3978

IMG_3956

INGREDIENTS:

2 1/2 cups cooked quinoa, at room temperature

4 large eggs, beaten

1/2 teaspoon fine-grain sea salt

1/3 cup finely chopped fresh chives

1 yellow or white onion, finely chopped

1/3 cup or 15 g freshly grated Parmesan cheese

3 cloves garlic, finely chopped

1 cup gluten-free bread crumbs- buy or simply cut gf bread into very small pieces

Water, if needed

1 tablespoon extra-virgin olive oil

  1. Combine the quinoa, eggs, and salt in a medium bowl.
  2. Stir in the chives, onion, cheese, and garlic. Add the bread crumbs, stir, and let sit for a few minutes so the crumbs can absorb some of the moisture.
  3. The dryer the mixture, the dryer the patties. I would reccomend leaving the mixture wet and sticky to create moist burgers. However if it is too dry, add additional breadcrumbs. Conversely, a bit more beaten egg or water can be used to moisten the mixture.
  4. Heat the oil in a large, heavy skillet over medium-low heat, add 3-4 patties, if they’ll fit with some room between each, cover, and cook for 7 to 10 minutes, until the bottoms are deeply browned.
  5. Turn up the heat if there is no browning after 10 minutes and continue to cook until the patties are browned. Carefully flip the patties with a spatula and cook the second sides for 7 minutes, or until golden.
  6. Remove from the skillet and cool on a wire rack while you cook the remaining patties. Alternatively, the quinoa mixture keeps nicely in the refrigerator for a few days; you can cook patties to order, if you prefer.

Love,

Ally

White-Chocolate & Strawberry Summer Cookies

Although the start of the school year and the Fall is 100% my favorite time of the year, I was instantly sad when I realized that there was only one month left of summer vacation. This means no more beach volleyball, no more days of idle relaxation, and most of all no more lemony, fruity, or bright-tasting summer recipes :(.

Upon realizing how close the end of the Summer was (September 22), I realized that I wanted to take full advantage of this beautiful time of the year. I’m traveling to Scandinavia for two weeks with my family and cannot wait to spent my days hiking and exploring a part of the world that is so mysterious. We will be climbing inside viking ships, biking around Copenhagen, hiking the beautiful hills of Oslo, kayaking in Bergen etc. We leave in 2 days, and I am becoming INSANELY excited!!! Although it is cooler in Scandinavia than in New York, I know that these two weeks will be the most memorable and (luckily) long (only 7ish hours of darkness a day!) days of my life.

I decided that for the next 6 days, and the 2 weeks following our trip, that I am taking advantage of Summer in NYC. I plan on having picnics in Central Parks, sitting on my family’s secret rock that juts out over The Hudson River to watch the sunset, playing volleyball on local courts, visiting the MOMA, going on walks with friends etc. Most of all, I plan on cooking and baking the summery-ist (yes I make up my own words) recipes of the year. Starting off with the best cookies that I’ve ever made doesn’t seem like a bad place to start :)!!!

These summer cookies are the most unique and mouth watering cookies that have ever come out of my oven. You wouldn’t expect cream cheese, white chocolate, and strawberry to work so well, but, honestly, they couldn’t have gone better together. ENJOY!

INGREDIENTS

1 1/4 cup all-purpose flour

1/2 teaspoon baking powder

1/8 teaspoon salt

1/4 cup unsalted butter-softened

4 oz cream cheese-softened

3/4 cup sugar

1 egg

1 teaspoons vanilla extract

3/4 cup chopped fresh strawberries

2 tablespoon lemon juice

1-2 tablespoon flour

5 oz white chocolate-chopped

sanding sugar

DIRECTIONS:

  1. Preheat the oven to 350 F and line pans with parchment paper.
  2. Pour fresh lemon juice over chopped strawberries, drain them after a few minutes.
  3. Whisk together 1 1/4 cup all-purpose flour, salt and baking powder and set aside.
  4. Beat butter with sugar and cream cheese until it’s light and fluffy.
  5. Add egg and vanilla and mix well.
  6. Gradually add flour mixture and mix until it’s well combined.
  7. Stir in chopped white chocolate.
  8. Sprinkle strawberries with 1-2 tablespoon flour, toss them until all strawberries are coated with thin layer of flour and then stir them really gently in the batter.
  9. Drop heaping tablespoon of batter onto pan leaving an inch space between.
  10. Set the cookies in the refrigerator for 5-10 minutes before baking.
  11. Sprinkle the cookies with sanding sugar if you want, but do not overdo it because they are sweet enough.
  12. Bake for 13-15 minutes( until the edges become golden brown).
  13. Let them cool a few minutes in the pan than transfer them to a wire racks to cool completely.

Love,

Ally

Gluten-Free Lemon Pie

As I mentioned in my last post, we recently bought a bunch of bags of gluten-free pie crust. My gluten-free mom was ecstatic when they arrived in the mail, and I have been working on gluten-free pies, quiche etc. for the past few weeks.

Also….. SUMMER!! I had my last day of Junior year last week, and I’m so excited for the best summer yet. I have a bunch of classes scheduled, volleyball camps, and I’m working with an organization called DOROT (check out their adult, child, and teen volunteering programs dorotusa.org. Their work is incredible). Nevertheless, I’ll have 100% more time to cook, bake, and work on my blog.

In the spirit of summer, I decided to make a gluten-free lemon (non-meringue [ew]) pie. I really enjoy preparing recipes in the summer when I can use the freshest in-season fruit. I knew that the best way to celebrate the beginning of the season was cook a citrus focused pie. I wanted to give the recipe a bit more of a punch, so I added a layer of lemon curd on the top of the pie.

This pie is basically a giant lemon bar that tastes even more delicious with the lemon curd on top. The smooth texture of the pie goes perfectly with the very sweet, tangy taste of lemon; you need to have a strong sweet tooth to enjoy this dessert.

ENJOY!!

DSC_1096


DSC_1113

Ingredients

Gluten-Free Pie Crust
1 1/4 cups Gluten-Free Multi-Purpose Flour 
1/2 teaspoon xanthan gum
1/2 teaspoon salt
6 tablespoons cold butter
1 large egg
2 teaspoons lemon juice or vinegar
Lemon Base
3 egg yolks 
1 1/2 cups sugar
1/3 cup plus 1 tablespoon cornstarch
1 1/2 cups water 
3 tablespoons butter or margarine 
2 teaspoons grated lemon peel
1/2 cup lemon juice
2 drops yellow food color, if desired
Lemon Curd Topping
1/2 cup fresh lemon juice
2 teaspoons of lemon zest
1/2 cup sugar
3 eggs
6 tablespoons of butter cut into very small squares

Directions

  1. Whisk together the flour or flour blend, sugar, xanthan gum, and salt.
  2. Cut the cold butter into pats, then work the pats into the flour mixture until it’s crumbly, with some larger, pea-sized chunks of butter remaining.
  3. Whisk the egg and vinegar or lemon juice together until very foamy. Mix into the dry ingredients. Stir until the mixture holds together, adding 1 to 3 additional tablespoons cold water if necessary.
  4. Shape into a ball and chill for an hour (up to overnight). Allow the dough to rest at room temperature for 10 to 15 minutes before rolling.
  5. Meanwhile, preheat oven to 475 and lightly grease a 9″ pie pan
  6. Roll out on a piece of plastic wrap, on a silicone rolling mat, or in a pie bag that’s been heavily sprinkled with gluten-free flour or flour blend. Invert the crust into the prepared pie pan.
  7. Cook for 8-10 minutes or until the crust is light brown color.
  8. When the crust is done remove from over and lower oven heat to 400 .
  9. While the crust is cooking beat egg yolks together with a fork.
  10. In 2-quart saucepan, mix sugar and cornstarch; gradually stir in water. Cook over medium heat, stirring constantly, until mixture thickens and boils. Boil and stir 1 minute.
  11. Immediately stir at least half of hot mixture into egg yolks; stir back into hot mixture in saucepan. Boil and stir 2 minutes; remove from heat.
  12. Stir in butter, lemon peel, lemon juice and food color.
  13. Pour into pie crust. Bake 8 to 12 minutes or until the surface of the pie is not longer wet.
  14. Cool away from draft for around 30 minutes.
  15. While the pie is cooling make the lemon curd. 
    1. Whisk the juice, eggs, and sugar together in a saucepan. Mix in the butter over low heat. CONTINUE TO WHISK, if the eggs become overheated they will cook on their own. 
    2. Whisk for around six minutes or until the curd is thick and the lines of the whisk hold. It will be done when the first bubbles appear.
    3. Remove from heat and pour into a bowl. Immediately cover and cool for 15 minutes
  16. After 15 minutes, spread the still-warm curd over the top of the lemon pie.
  17. Let sit for another hour and then cover and refrigerate until ready to serve.


Love,

Ally


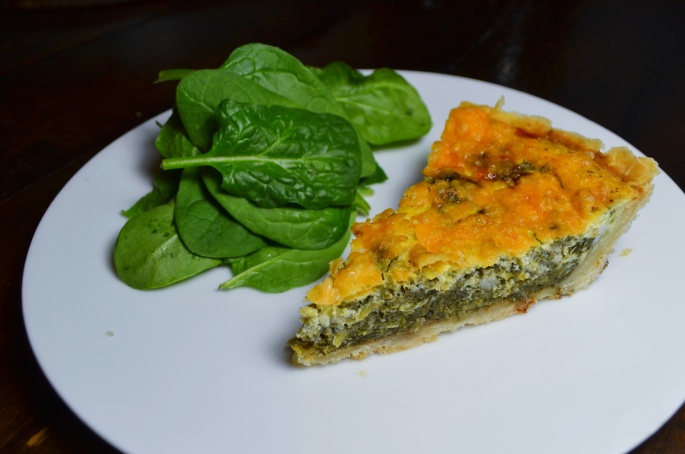
Apartment-made Gluten-Free Spinach Quiche

A few weeks ago my mom, who is gluten-free and had been craving quiche for months, ordered five bags of gluten-free pie crust mix online. When it arrived in the mail, she was so excited to have quiche for the first time in five years, that I knew I had to get cooking right away. So, I spent the entire next Saturday making her two quiches and a lemon pie with gluten free crust. Daughter-of-the-year.

When scouring the internet for recipes, I found a quiche recipe with stellar reviews, and I decided to give it a shot. The recipe called for a half-cup of butter, and before I realized how much butter this really was, I had already put it in the quiche. Unfortunately, the quiche came out a little too buttery and rich for my mom’s taste, so I knew that I would have to try again. On the second try, I added only two tablespoons of butter, used fresh spinach, added a bit more salt, and was pleased to find that the quiche was perfect. I recommend using as many fresh ingredients as possible. The fresher the better!!!

ENJOY! Oh…and here are some links to our favorite gluten-free pie crusts:

1. https://www.amazon.com/Moon-Rabbit-Gluten-Pastry-16-4-Ounce/dp/B007SM715K/ref=sr_1_8_a_it?ie=UTF8&qid=1496112570&sr=8-8&keywords=gluten%2Bfree%2Bpie%2Bcrust%2Bmix&th=1

2. https://www.amazon.com/Glutino-Gluten-Free-Pantry-16-Ounce/dp/B000EVIDVI/ref=sr_1_3_a_it?ie=UTF8&qid=1496112617&sr=8-3&keywords=gluten+free+pie+crust+mix

DSC_1186


INGREDIENTS

2 tbsp butter

3 cloves garlic, chopped

1 small onion, chopped

1 (10 ounce) package frozen chopped spinach, thawed and drained

I would reccomend substituting for 10oz of microwaved fresh spinach for fresher ingredients.

1 (4.5 ounce) can mushrooms, drained

1 (6 ounce) package herb and garlic feta, crumbled

8 ounce shredded Cheddar cheese

1 (9 inch) unbaked deep dish pie crust

For a recipe for a pie crust see below.

4 eggs, beaten

1 cup whole milk (skim milk for low-fat option))

salt and pepper to taste

DIRECTIONS

  1. Preheat oven to 375 degrees F (190 degrees C).
  2. In a medium skillet, melt butter over medium heat. Saute garlic and onion in butter until lightly browned, about 7 minutes.
  3. Stir in spinach, mushrooms, feta and 1/2 cup Cheddar cheese. Season with salt and pepper. Spoon mixture into pie crust.
  4. In a medium bowl, whisk together eggs and milk. Season with salt and pepper. Pour into the pastry shell, allowing egg mixture to thoroughly combine with spinach mixture.
  5. Bake in preheated oven for 15 minutes. Sprinkle top with remaining Cheddar cheese, and bake an additional 35 to 40 minutes, until set in center. Allow to stand 10 minutes before serving.


Continue reading “Apartment-made Gluten-Free Spinach Quiche”

S’more Bars

Oddly enough, when asking my volleyball team for ideas about what to bake, the first request was ‘s’mores cookies’. Not being a lover of marshmallows and never having had a s’more cookie, I immediately dismissed the idea. On my way home from practice, in a taxi with a few girls from my team, I looked up recipes for s’mores cookies. Nothing interesting came up, but the pictures I saw looked sooooo good. I decided that I would make up a recipe on my own.

After a little research and deliberation, I decided that s’mores brownies would be a fresh twist on the cookie concept. I looked up a recipe for s’mores and came across a version that looked delicious. I loosely followed this recipe – adding and subtracting a bunch of ingredients. I brought these bars to Sunday practice, and my team LOVED them. My coach offered to buy me the ingredients if I would make them for him again. The dessert tastes like a campfire; smokey, chocolatey s’mores, but even tastier. These are my new go-to bar recipe. Enjoy!

INGREDIENTS

1⁄2 cup butter, softened

3⁄4 cup sugar

1 egg

1 teaspoon vanilla extract

1 1⁄3 cups flour

3⁄4 cup graham cracker crumbs

1 teaspoon baking powder

1⁄4 teaspoon salt

16 oz milk chocolate chocolate chips (of 4 large hershey bars)

3 cups miniature marshmallows

DIRECTIONS

  1. Heat oven to 350ÂşF. Grease an 8 inch square baking pan.
  2. Beat butter and sugar together until well blended in a large bowl. Add egg and vanilla; beat well.
  3. In another bowl stir together flour, graham cracker crumbs, baking powder, and salt. Add to butter mixture, beating until blended.
  4. Press half the dough into the prepared pan. Bake 15 minutes.
  5. Spread the chocolate chips over the baked layer. Sprinkle with marshmallows. Scatter remaining dough over the marshmallows, forming a top layer.
  6. Bake 10- 15 minutes or until just lightly browned. Cool completely before cutting.

Love,

Ally


http://www.food.com/recipe/smores-bars-169114#activity-feed

Gluten-Free Challah

I have so many memories of sitting on the counter in our California kitchen, face and hands covered in flour. In front of me lay three balls of dough. I would grab a ball of dough and roll it between my hands until it formed a small and wide log of dough. I would then grab each end of the log with my tiny hands and swing it in circles, similar to swinging a jumprope, until if formed a long rope.  After the rope was long enough, I would move on to the next ball. After all the balls were rolled into even ropes, I would attach them together at one end and begin to braid. I don’t remember ever learning how to braid challah, only already knowing how to do it. Once the three ropes were perfectly braided together, we would use an ‘egg white wash’ to coat the top of the challah and then set aside the loaf to rise. Finally, we would place the braided loaf in the oven and 40 minutes later my mom would pull out a perfect, gorgeous challah.

As I grew up, we made less and less challah. Four years ago, my mom went gluten-free, minimizing our challah-making tradition. Since today is Friday, and I have the day off school, I was reminiscing about the days of my childhood when I would be making challah. On my way home from an orientation for a college course I am taking  at John Jay College, I stopped by Gristedes to buy ingredients for a separate recipe that I was planning on preparing and I stumbled across gluten-free yeast. I quickly grabbed the yeast (I obviously didn’t steal it) and ran home to make gluten-free challah. Since I was expecting the challah to come out tasteless and dry, I was ecstatic to find that I LOVEDDDDD it!

dsc_0438

dsc_0448


INGREDIENTS

1/3 cup+ warm water

1 package rapid rise gf yeast

1 tsp. granulated cane sugar

1 cup full-fat coconut milk

1 tablespoon + 1 tsp. apple cider vinegar

5 large egg yolks at room temperature (slightly mixed)

1/3 cup canola oil, coconut oil (warmed to liquid) or extra virgin olive oil

4 Tbs. honey, agave nectar or molasses

4 cups all-purpose gluten-free flour

3 Tbs. + 2 tsp. granulated cane sugar

1 1/4 tsp. kosher salt

1/2 tsp. baking soda

2 tsp. gluten-free baking powder

1 large egg, mixed

chia seeds, sprinkles, poppy seeds, sesame seeds, raisins, chocolate chips etc.


DIRECTIONS

  1. Preheat your oven to 200Âş F, then turn it off and leave the oven door closed. Prepare a baking sheet by lining it with parchment paper.
  2. In a small bowl, mix together the warm water, yeast and 1 teaspoon of sugar to proof the yeast; set aside. It should take around five minutes to bubble/proof. If no change is seen by then, through it out and start again with new yeast, sugar and water.
  3. In the bowl of your stand mixer, mix the coconut milk, apple cider vinegar, egg yolks, oil and honey together until completely combined.
  4. Whisk together the flour, sugar, salt baking soda and baking power in a separate bowl.
  5. Stir in the proofed water/yeast mixture into the bowl of the stand mixture. Then, gradually stir in the dry ingredients until fully integrated, adding more warm water by the tablespoon as needed to get the dough soft and so that the dough is not tight or stiff, then mix 1-2 minutes more on medium speed.
  6. Once the dough is combined, divide it in half and divide each half into three equally-sized balls. The dough will be sticky, so use extra gluten-free flour on your hands and rolling surface. Roll each ball out into an 18-inch coil or log on a clean, flat surface dusted lightly with Flour.
  7. Pinch together one end of each coil, possibly wetting them slightly with water to help them join together at the top if necessary. Braid the three coils together, pinching together at the end.
  8. Gently transfer it to the parchment-lined baking sheet. Repeat for the second set of three balls.
  9. In a small bowl, mix the extra egg together and brush over each loaf well, coating the entire top surface. Sprinkle the seeds or any toppings at this point, then place the tray (covering the loaves with wax paper sprayed with cooking oil) into the preheated oven for approximately 20 – 30 minutes. (Don’t expect the bread to rise much at this stage).
  10. Once risen slightly, place the uncovered tray in an oven preheated to 350Âş F (static) or 325Âş F (convection) for 20 minutes. Remove to cool on a wire rack.

Thanks,

Ally

Original recipe credit to GFJules [fun fact: my mom also goes by jules and is gluten free! How weird]

Lemon Bars with Smooth Lemon Glaze

The moment I LOVE the summer most seems to always be in the middle of the winter. Although drinking hot drinks, wearing cute boots and cozying up to watch a movie may sound fun from afar, by the time February rolls around, all I want to do is lay on a beach somewhere sipping iced tea. As this winter has progressed, my desire to cook and bake winter dishes has slowly decreased, and I’ve evidently begun to make fruity and sweet dishes once again.

On that note, I wanted to make something summery and lemony. I decided to bake lemon bars with a twist. I made a tart lemon glaze and spread it over the top of the lemon bars, adding a unique, zesty kick. Since lemon bars are already so sweet, adding the sour glaze didn’t change the level of tartness, but perfectly complimented the flavor of the actual lemon bars making everything more smooth, balanced, and flavorful.

dsc_0255

dsc_0273

dsc_0269


INGREDIENTS

1 cup butter, softened

1/2 cup granulated sugar

2 cups all-purpose flour

4 eggs

1 1/2 cups white sugar

1/4 cup all-purpose flour

2 lemons, juiced

Glaze

2 cups confectioners’ sugar

2 tablespoons lemon zest

1/3 cup fresh lemon juice

DIRECTIONS

  1. Preheat oven to 350 degrees F (175 degrees C).
  2. In a medium bowl, blend together softened butter, 2 cups flour and 1/2 cup sugar. Press into the bottom of an ungreased 9×13 inch pan.
  3. Bake for 15 to 20 minutes in the preheated oven, or until firm and golden.
  4. While the crust is baking, whisk together the remaining 1 1/2 cups sugar and 1/4 cup flour. Whisk in the eggs and lemon juice. When the crust is done, pour evenly over the top.
  5. Bake for an additional 20 minutes in the preheated oven. The bars will continue to firm as they cool. Let cook in the pan and then cup into squares.
  6. To make the glaze, whisk the confectioners sugar, lemon zest, and lemon juice together until smooth.
  7. Pour the glaze over the top of each lemon bar square. Cover the bars fully with the glaze as a top layer.
  8. Enjoy!!!

Love,

Ally

Sweet Potatoes With Marshmallow

So it seems like the cooking-debate of the year is the difference between sweet potatoes and yams. Should this dish be Sweet Potatoes With Marshmallow or Yams With Marshmallow? According to my husband Google, the yams you see in a US grocery store are usually not TRUE yams, which are native to Asia and Africa and found in international markets or abroad. The yams in grocery stores are simply a firmer form of the common and traditional Thanksgiving sweet potato, with extremely subtle differences in the flavors. Interesting, right?

I’m not sure what to say about this recipe except that it was by far the best dish of our Thanksgiving holiday. Everyone at my meal asked for second helpings, and at one point told me how delicious it was. I know many people are not crazy about the idea of marshmallows topping sweet potatoes, but this dish was absolutely incredible. While it is very sweet, every ingredient works perfectly to compliment the central flavors of the traditional Thanksgiving meal. Happy Holidays!

dsc_0154

dsc_0155

 INGREDIENTS

4 pounds red-skinned sweet potatoes (yams), peeled, cut into 1-inch pieces

2/3 cup packed golden brown sugar

5 tablespoons butter

1 teaspoon ground cinnamon

1/2 teaspoon salt

1/4 teaspoon ground nutmeg

Pinch of ground ginger

3 cups miniature marshmallows


DIRECTIONS

  1. Preheat oven to 375°F. Arrange potatoes in 13 x 9 x 2-inch glass baking dish. Combine sugar, butter, cinnamon, salt, nutmeg and ginger in heavy small saucepan over medium heat. Bring to boil, stirring until sugar dissolves.
  2. Pour over potatoes; toss to coat. Cover dish tightly with foil.
  3. Bake potatoes 50 minutes. Uncover; bake until potatoes are tender and syrup thickens slightly, basting occasionally, about 20 minutes.
  4. Increase oven temperature to 500°F. Top potatoes with marshmallows and nuts. Return to oven; bake until marshmallows begin to melt and nuts begin to brown. (about 3 minutes).

Love,

Ally

Homemade Classic Turkey Stuffing

There is no better time of year for someone who loves cooking and baking than November and December. From Thanksgiving dinner, to peppermint cookies, to Hanukkah latkes, to New Years Eve appetizers, there is such a variety of ingredients, flavors, and themes that I can use in my cooking and baking that are special to these Winter months. As you can tell, I hold myself to high standards in the holiday spirit and enthusiasm category. I’m determined that I will, until the end of the holiday season, continue to bake only wintery and holiday themed recipes.

Staying in the realm of classic holiday dishes, I decided that this week I was in the mood to make classic Thanksgiving stuffing. Although this recipe appears, at first glance, to have nothing that differs from grocery store stuffing kits, the effect of freshly cut bread is powerful. The fresh bread gives this dish a fluffier texture and lighter consistency and helps to bring forward the flavors of the other ingredients. Although stuffing has always been one of my favorite holiday dishes, making it from scratch is always better.

This stuffing was fresh out of the oven when we ate it and it would perfectly compliment any other Winder holiday meal (OF COURSE!!). Don’t forget homemade turkey gravy. Happy December!!!!


dsc_0139


INGREDIENTS

3/4 cup butter or margarine

2 large celery stalks, chopped

1 medium onion, chopped (1/2 cup)

9 cups white or sour dough bread cut into cubes

1 1/2 teaspoons chopped fresh thyme leaves or 1/2 teaspoon dried thyme leaves

1 teaspoon salt

1/2 teaspoon ground sage

1/4 teaspoon pepper

DIRECTIONS

  1. Lay the bread cubes out on a baking sheet and bake at 300 degrees for 10 minutes, or until slightly crispy.
  2. Meanwhile, melt butter in 4-quart Dutch oven over medium-high heat. Cook celery and onion in butter 6 to 8 minutes, stirring occasionally, until tender. Remove Dutch oven from the heat.
  3.  Gently toss the toasted bread with the celery mixture and the remaining ingredients, using spoon, until bread cubes are evenly coated.
  4. Use to stuff one 10- to 12-pound turkey. Or to bake stuffing separately, grease 3-quart casserole or rectangular baking dish, 13x9x2 inches.
  5. Place stuffing in casserole or baking dish. Cover with lid or aluminum foil and bake at 325°F for 30 minutes; uncover and bake 15 minutes longer.


Love,

Ally

Holiday Cranberry Sauce

Being completely honest, I have never actually helped make a Thanksgiving dinner before today. It seems that we were always either going to our friends’ house for the holiday or visiting a relative’s location. But this year, I traveled to my grandmother’s home in Tucson, Arizona for Thanksgiving, and I insisted on contributing. I decided on making cranberry sauce, stuffing, turkey gravy and sweet potatoes. I couldn’t have been prouder of the dishes that I made (except for the gravy which was a total disaster hahaha), and all three dishes were the first to completely disappear!

I have never really been a fan of cranberry sauce and decided to try it because it is such a critical part of the Thanksgiving holiday tradition. Homemade cranberry sauce is so much better than I imagined. Only after eating it did I realize that the reason I never liked cranberry sauce was because it was always from a jar or can. This recipe is a traditional, simple cranberry sauce, but ended up tasting so smooth, flavorful and fruity. The lemon definitely adds a kick of flavor that the cranberry sauce usually lacks.

In advance, this recipe is very sweet and tastes more like a fruit-based, dessert-like side dish rather than a savory sauce. If you want to tone the sweetness down a little, simply add less sugar.

ENJOY!


dsc_0011

dsc_0017

dsc_0007

Ingredients

1 cup sugar

12 oz bag fresh cranberry

1 tsp of lemon zest

2 tbsp water

Directions
1. Empty the cranberries into a saucepan and transfer 1/2 cup of them to a seperate small bowl.

2. Add sugar, lemon zest and water to the saucepan and cook over low heat, stirring occasionally, until the sugar dissolves and the cranberries become soft, about 10 minutes.

3. Increase the heat to medium and cook until the cranberries burst, about 12 minutes.

4. Reduce the heat to low and stir in the 1/2 cup of reserved cranberries. Add more sugar, salt and pepper to taste and cool to room temperature before serving.

Love,

Ally